

WEGIC Roof Controller System User Manual
Austrack Hybrid Campers are fitted with a WEGIC Electric Pop-Top Roof Lift System, designed to provide smooth, reliable roof operation with minimal effort. The system allows the pop-top roof to be raised and lowered vertically, increasing internal headroom when stationary and maintaining a low travel height when lowered.
System Overview
The electric roof lift system operates using two electric actuators and gas struts controlled by a central controller. The roof can be operated using any of the following:
- Touchscreen control panel
- Rocker switch
- Remote control
A complete lift or lower cycle typically takes less than 35 seconds.
Key Features
- One‑touch pop‑top roof operation
- Increased interior headroom when raised
- Industrial‑grade electric actuators with gas struts
- Load capacity of up to 210 kg
- Designed for 10,000+ operating cycles
- Quiet operation (below 80 dB)
- Waterproof and wind‑resistant design
- Manual lowering function in case of power loss
System Components
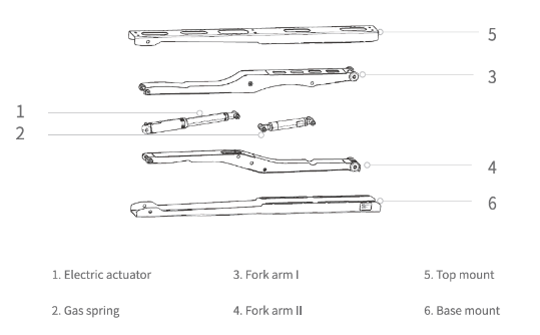
The roof lift system consists of:
- Electric actuators (x2)
- Gas struts
- Lifting arms
- Base mounts and top mounts
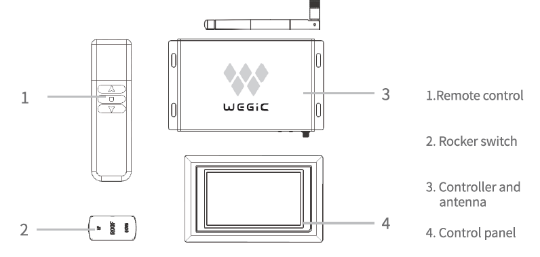
- Central controller
- Touchscreen control panel
- Rocker switch
- Remote control
Technical Specifications
| Specification | Value |
| Maximum Load Capacity | Up to 210kg |
| Maximum Extended Height | 850 mm |
| Collapsed Height (loaded) | 110 mm |
| Lift / Lower Time | ≤ 35 seconds |
| Input Voltage | 12 V DC |
| Operating Temperature | -40°C to 70°C |
Control Methods
Remote Control Operation
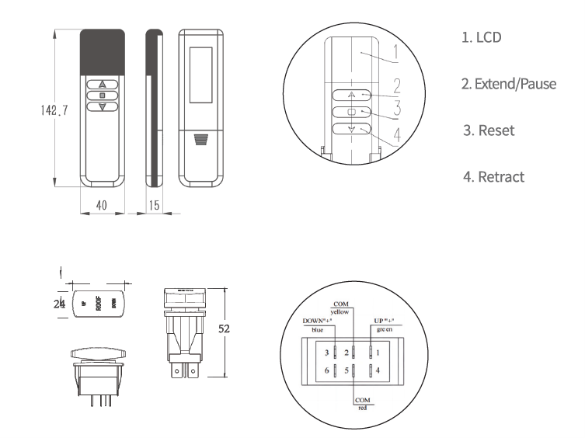
- Waking the Remote:
- Press any button to wake the remote from sleep mode. The display will illuminate briefly
- Raising the Roof:
- Briefly press the UP button
- The roof will rise to the preset height
- Press again during movement to pause
- Press again to resume
- Lowering the Roof:
- Press and hold the DOWN button for more than 1 second
- Release to pause lowering
- Press and hold again to continue
- Reset (Calibration)
- Press and hold the RESET button
- Allow the roof to descend fully
- Continue holding for 3 seconds
- The roof will briefly rise and settle at ZERO
- A confirmation beep indicates reset is complete
Rocker Switch Operation
- Raising the Roof:
- Briefly press the UP side of the switch
- Blue LED indicates upward movement
- Press again to pause
- Press again to resume
- Lowering the Roof:
- Press and hold the DOWN side of the switch
- Amber LED flashes during the lowering
- Release to pause, press and hold again to continue
Touch Screen Control Panel Operation
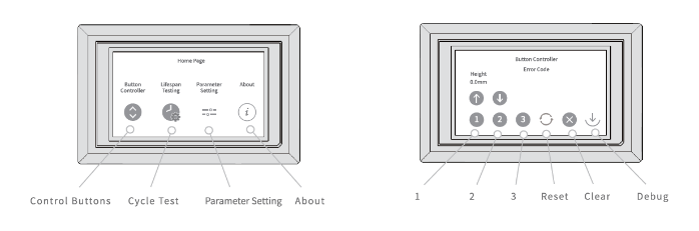
- Main Screen:
- The home screen displays current roof height and system status.
- Roof Position Buttons
- Position 1: Fully Lowered
- Position 2: Intermediate Height
- Position 3: Fully Raised
- Manual Control
- Tap UP to raise the roof
- Press and hold DOWN to lower the roof
- Reset Function
- Press and hold RESET
- Allow for full descent
- Continue holding 3 seconds after reaching ZERO
- Reset completes automatically
- Alarms
- Press the red X icon to clear alarms after resolving the fault.
THE DEBUG FUNCTION IS FOR TECHNICIAN USE ONLY AND SHOULD NOT BE USED BY OWNERS.
Electrical Protection Features
The controller continuously monitors system operation and includes:
- Over-current protection
- Over-voltage protection (above 14.6 V)
- Under-voltage protection (below 10 V)
If any fault is detected, the system will stop and display an alarm code.
Manual Roof Lowering (EMERGENCY USE)
If power is unavailable or the system cannot operate electrically:
- Ensure there3 are no obstructions in the roof’s movement path
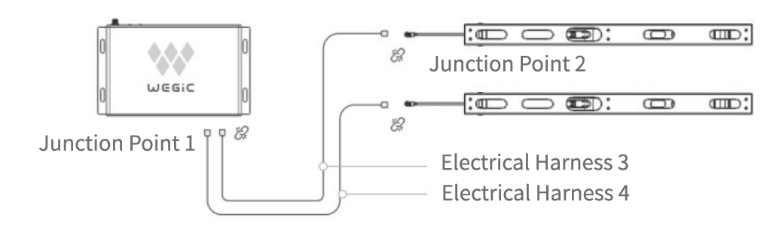
- Disconnect the motor wiring connectors from the controller
- Manually press or pull the roof down evenly
- Once power is restored, reconnect wiring and perform a system reset before use
Reset and Remote Pairing
- Reset Checks (Before Reset)
- Wiring harness connected securely
- Roof mechanism securely fastened
- No foreign objects in the lifting area
- Reset Procedure
- Press and hold RESET
- Roof descends fully
- Continue holding until roof rebounds slightly
- Reset completes when height displays 0 mm
⚠ Error codes during reset (E05–E08) are normal — continue the reset process.
- Remote Pairing
- Press and hold the FRQ (Pairing) button on the controller
- Red and green lights flash together
- Press any button on the remote
- Green light remains – Pairing complete
Fault Codes & Troubleshooting
| Code | Description |
| E02 | Actuator Synchronisation Fault |
| E03 | Power Supply Undervoltage |
| E04 | Power Supply Overvoltage |
| E05 | Channel 1 Rising Overcurrent Warning |
| E06 | Channel 2 Rising Overcurrent Warning |
| E07 | Channel 1 Lowering Overcurrent Warning |
| E08 | Channel 2 Lowering Overcurrent Warning |
| E09 | Controller Over-current |
| E10 / E11 | Actuator Signal Fault |
| E16 | Power Lost During Operation |
General Troubleshooting
- Remove any obstructions
- Check power supply
- Inspect wiring connectors
- Perform a system reset
Important Safety Warnings
⚠ Do NOT operate the roof if:
- An error code is active without identifying the cause
- The roof is obstructed
- One side of the roof latch is engaged
- Mounting bolts are loose
- The controller is installed near strong magnetic fields
Failure to follow these warnings can result in structural damage to the roof mechanism.
Want to download the full copy?
